Shape Description and Shape Files
AutoCAD provides the ability to define geometric shapes and create complete text font sets. Shape files contain definitions of individual elements that constitute the shape of the entity. The basic elements are lines and arcs.
Shapes take up less space than Blocks but cannot be exploded or edited.
Shape definition has two components: the header and the shape definition. The header is a single line while the shape definition can be many lines of code.
Shape definitions must end in a carriage return (ENTER).
The following code is for the symbol representing an electronic resistor
![]() *101,8,RESI
*101,8,RESI
020,023,04D,043,04D,023,020,0
Header Line
*101 ---- the shape number, between 1 and 255
8 ---- the number of data bytes (separated by commas in line 2) for the shape description
RESI ---- the name of the shape; it must be in all capitals
Shape Definition Line
Each data byte contains three elements: a hexadecimal notation, vector length, and vector direction code.
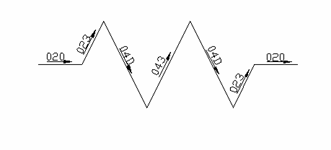
For the first data byte, 020, above:
0 ---- Hexadecimal notation
2 ---- Vector length
0 ---- Direction code, using the guide below

Drawing shapes with only lines and vector directions is limiting. Lines at other directions, arcs, and movment without drawing entities provides greater possibilities. Some of these limitations can be overcome through the use of special codes.
000 End of the shape file, can be shortened to a single 0
001 Activate ddraw mode (pen down mode)
002 Deactivate draw mode (pen up)
003 Divide the vector length by the next byte
004 Multiply vector lengths by the next byte
005 Push current location from stack (saving a location)
006 Pop current location from the stack (restoring a location)
007 Draw a subshape number given by the next byte (calling a subshape)
008 X-Y displacement given by the next two bytes (non uniform lines)
009 Multiply X-Y displacement, terminated by (0,0) cont. use of non-uniform line
00A or 10 Octant arc defined by the next two bytes
00B or 11 Fractional arc defined by the next two bytes
00C or 12 Arc definition by X-Y displacement and bulge
00D or 13 Multiple bulge-specified arcs (continuous use of bulge arc)
00E or 14 Process the next command only if vertical text style
Skipping around the drawing without drawing lines pen-up (002) and pen-down (001)
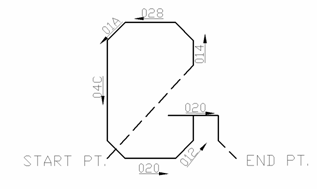
*102, 20, GEE
002,042,
001,014,016,028,01A,
04C,01E,020,012,014,
002,018,
001,020,01C,
002,01E,0

*103, 10, TINES
005,005,005,012,006,014,006,016,006,0
Push (005) must equal pop (006)
OCTANT ARC, Code 00A
or 10
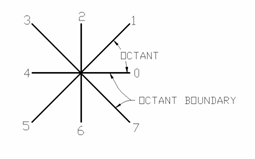
Dividing 360 degrees into eight equal parts yields eight equal angle segments of 45 degrees called octants. The lines limiting the octant are called octant boundary and are numbered 0-7.
The general format for drawing an octant arc is: 10,(R,+/-0SN) or 00B,(R,+/-0SN) where:
R ---- radius of the arc
+/- ---- defines direction, + is counterclockwise, – is clockwise
S ---- starting octand bundary number
N ---- number of octants covered in the arc
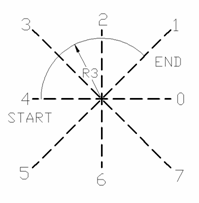
*104,5,ARK1
001,10,(3,-043),0
FRACTIONAL ARC, Code
00B or 11
The format is:
00B,(start offset, end offset, high radius, low radius, +/ – 0SN)
start offset = (starting angle of the arc – nearest octant angle less than the arc) * 256/45
end offset = (ending angle of the arc – nearest octant angle less than the arc) * 256/45
high radius = 0 if radius of the arc is 255 or less
low radius = the radius of the arc
+/ – : + is counterclockwise, – clockwise direction of arc
0 = Hexadecimal notation
S = starting octant boundary number
N = number of octants covered in the arc
e.g. Construct a fractional arc radius = 3, starting at 20˚ and ending at 140˚ counterclockwise
End offset = (140 – 135) * 256/45 = 28.44 = 28
Start offset = (20 – 0) *256/45 = 113.7 = 114
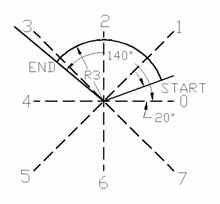
*105,8,ARK2
001,00B,(114,28,0,3,004),0
DISPLACEMENT AND BULGE
ARC, Code 00C or 12
The format is:
00C,(X,Y, +/- B)
Where:
X = X displacement
Y = Y displacement
+/- defines direction, + is counterclockwise arc, – is clockwise arc
B = bulge factor = ((2* H)/D) * 127
where H is height of arc, D is displacement
For an arc with four units between start and end and a height of 1
Bulge Factor = ((2 * H)/D) * 127 = ((2 * 1)/4) * 127 = 63.5
*106,5,ARC3
00C,(4,0,-63),0
SAVE the file with a .shp file extension. Enter the AutoCAD commands COMPILE, LOAD, and SHAPE to insert the shape into the drawing.